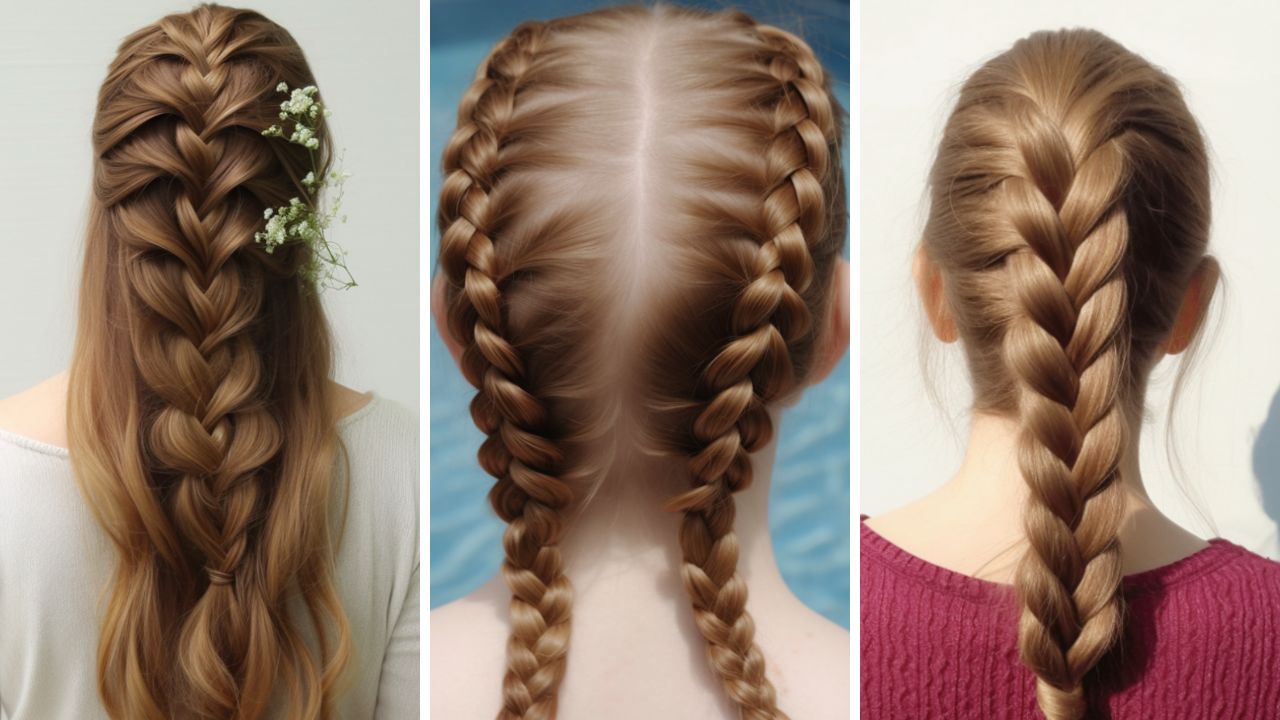
Are you looking to elevate your hair game with a trendy, eye-catching style that’s easy to achieve? The two-braid style has taken the fashion world by storm, offering a versatile and chic look that works for any occasion.
Whether you’re heading to work or a special event or want to switch up your everyday hairstyle, mastering the two-braid technique can be a game-changer.
But, you might be wondering, where do I start? How can I create this stylish look without spending hours in front of the mirror or breaking the bank at a salon?
Don’t worry; we’ve got you covered!
In this step-by-step guide, we’ll walk you through creating the perfect two-braid style, from preparing your hair to the final touches that will make your braids stand out.
We’ll also share expert tips and tricks to ensure your braids look sleek, polished, and ready to turn heads.
So, let’s dive in and discover how you can confidently rock this trendy hairstyle!
Basic Braiding Techniques
Before we dive into creating the trendy 2 braid style, it’s essential to master the basic braiding techniques that form the foundation of this look.
As someone who has spent countless hours experimenting with various braiding methods, I can attest to the importance of nailing down these fundamental skills.
Here’s a step-by-step guide to creating traditional, Dutch, and French braids:
1. Traditional Braid

- Divide your hair into three equal sections.
- Cross the right section over the middle section.
- Cross the left section over the new middle section.
- Repeat steps 2 and 3 until you reach the end of your hair.
- Secure with an elastic band.
2. Dutch Braid

- Start with three equal sections of hair.
- Cross the right section under the middle section.
- Cross the left section under the new middle section.
- Repeat steps 2 and 3, adding hair to each section as you braid.
- Secure the end with an elastic band.
3. French Braid

- Begin with three small sections of hair at the crown of your head.
- Cross the right section over the middle section.
- Cross the left section over the new middle section.
- Repeat steps 2 and 3, incorporating hair from the sides as you braid.
- Continue braiding until you reach the nape of your neck, then finish with a traditional braid.
- Secure with an elastic band.
Goddess Braids Tutorial
If you want to elevate your 2 braids style, goddess braids are the perfect choice.
With their thicker, more pronounced appearance, goddess braids add a touch of elegance and sophistication to your look.
As someone who has experimented with various goddess braid styles, I’m excited to share my tips and tricks for achieving a flawless finish.
1. How to Style
- Start with clean, detangled hair, and part it down the middle.
- Divide one side of your hair into three equal sections.
- Begin a Dutch braid by crossing the right section under the middle section and the left section under the new middle section.
- As you braid, add hair from the sides to each section, keeping the braid tight and close to the scalp.
- Continue braiding until you reach the nape of your neck, then finish with a traditional braid.
- Secure the end with an elastic band.
- Repeat the process on the other side of your head.
2. Tips for a Seamless Finish
- Use a rat-tail comb to create clean, precise partings.
- Keep the braids tight and uniform in size for a polished look.
- If you have longer hair, add more sections to your braids for a fuller appearance.
3. Variations for Longer Hair
- Create a half-up, half-down style by braiding only the top portion of your hair.
- Incorporate jumbo braids for a bold, statement-making look.
- To add visual interest, experiment with different braid patterns, such as crisscross or fishtail braids.
With these tips and variations, you can create stunning goddess braids that perfectly complement your 2 braids style, leaving you looking and feeling confident all day long.
Styling with Stitch Braids
Ready to elevate your 2-braid style to the next level? Stitch braids offer a unique and eye-catching way to do so.
As a braiding enthusiast, I’ve fallen in love with stitch braids’ versatility and creativity.
Here’s what you need to know about styling with stitch braids:
1. How to Style
- Start with a basic two braid foundation using traditional or Dutch braids.
- Once you reach the end of each braid, secure it with an elastic band.
- Using a small piece of hair from the end of the braid, wrap it around the base of the braid and thread it through the center, creating a “stitch” effect.
- Continue stitching along the length of the braid, ensuring even spacing between each stitch.
- Secure the end of the braid with another elastic band.
2. Care and Maintenance Tips
- Moisturize your braids regularly with a lightweight, non-greasy oil or spray to keep them looking fresh and prevent frizz.
- Protect your braids while sleeping by wearing a silk or satin scarf or bonnet.
- Avoid pulling or tugging on your braids, which can cause damage and breakage.
3. Popular Stitch Braid Styles
- Straight-back stitch braids: Create two stitch braids straight back from your forehead for a sleek, sophisticated look.
- Criss-cross stitch braids: Crisscross your stitch braids at the back of your head for a playful, trendy style.
- Half-up, half-down stitch braids: Combine stitch braids with loose waves or curls for a romantic, bohemian vibe.
4. Creative Parting and Design
Take your 2-braid style to new heights by incorporating creative partings and designs.
As someone who loves experimenting with different partings, I can attest to the impact these simple tweaks can have on your overall look.
Try these creative parting ideas:
- Criss-cross parting: Create a crisscross pattern at the front of your head before beginning your braids for a fun, edgy vibe.
- Heart parting: Use a rat-tail comb to create a heart-shaped parting at the crown of your head for a sweet, romantic touch.
- Geometric parting: Experiment with triangular, square, or zigzag partings to add a modern, artistic flair to your braids.
Adding Color and Accessories
Elevate your 2 braids style by incorporating color and accessories. As a lover of all things bold and beautiful, I’m always looking for new ways to add personality to my braids.
Here are some tips for using color and accessories:
- Hair color: Add highlights, lowlights, or temporary color sprays to your braids for a fun, playful look.
- Beads: Thread colorful beads onto the ends of your braids for a pop of color and texture.
- Cuffs: Add metal or wooden cuffs to your braids for an edgy, boho-inspired vibe.
- Rhinestones and gems: Attach small rhinestones or gems along your parting or braids for glamour.
Remember, a little goes a long way when it comes to accessories. Choose one or two statement pieces to avoid overwhelming your look and let your personality shine through.
Advanced Braiding Techniques
Once you’ve mastered the basic braiding techniques and experimented with stitch braids, it’s time to explore some advanced methods to take your 2-braid style to the next level.
As someone who loves to push the boundaries of braiding, I’m excited to share some of my favorite innovative techniques with you.
1. Rope Braid
- Divide your hair into two equal sections.
- Twist each section in the same direction until they’re tightly coiled.
- Wrap the two twisted sections around each other in the opposite direction.
- Secure the end with an elastic band.
- Repeat on the other side for a 2 braids style with a unique, twisted texture.
2. Ladder Braid
- Start with a small section of hair at the front of your head.
- Divide this section into two equal parts.
- Cross the right section over the left, then add a small piece of hair to the right section.
- Cross the left section over the right, adding a small piece of hair to the left section.
- Continue this process, adding hair and crossing sections until you reach the back of your head.
- Repeat on the other side and finish with regular braids for an intricate, woven look.
3. Crochet Braid
- Create a basic 2 braids style using Dutch or French braids.
- Pull small sections of hair through the braids using a crochet hook to create loops.
- Continue adding loops along the length of each braid for a voluminous, textured effect.
4. Heart Pull-Through Braid
- Create a heart-shaped parting at the crown of your head.
- Divide the hair within the heart into two sections.
- Begin a pull-through braid by dividing the right section into two equal parts.
- Pull the left section through the center of the divided right section.
- Divide the left section into two equal parts, and pull the right section through the center.
- Continue this process, adding hair from the sides as you work your way down.
- Finish with regular braids and secure with elastic bands.
By incorporating these advanced braiding techniques into your 2 braids style, you can create unique, eye-catching looks that showcase your creativity and skill. Don’t be afraid to mix and match techniques or put your spin on these methods to develop a style entirely your own.
Maintenance Tips for Lasting Braids
(an image of a girl maintaining her braids and taking car of it by applying conditioner)
Now that you’ve created your stunning 2 braids style, it’s crucial to maintain them to ensure they look fresh and last as long as possible.
As someone who has experimented with various braiding techniques, I’ve learned the importance of proper care and maintenance for keeping my braids looking their best.
Here are my top recommendations for maintaining your braids:
1. Scalp Care
- Cleanse your scalp with a diluted shampoo or a specialized braids cleanser to remove dirt and buildup.
- Use a soft-bristled brush or fingertips to massage your scalp, promoting circulation and preventing itchiness.
- Apply a lightweight, non-greasy scalp oil to keep your scalp moisturized and healthy.
2. Moisturizing
- Spritz your braids with a water-based moisturizing spray to keep them hydrated and prevent frizz.
- Apply a small amount of lightweight, non-greasy oil to the length of your braids to seal in moisture and add shine.
- Please focus on the ends of your braids, which are the most prone to dryness and damage.
3. Protecting Your Braids
- Sleep with a silk or satin scarf or bonnet to minimize friction and prevent frizz.
- Avoid pulling or tugging on your braids, as this can cause breakage and damage.
- Wear a swim cap to protect your braids from chlorine and salt water when swimming.
By following these simple maintenance tips, you’ll be able to keep your 2 braids style looking fresh, moisturized, and beautiful for weeks to come.
Remember, a little TLC goes a long way in ensuring the longevity and health of your braids.
FAQs on Braiding Techniques and Care
As someone who has spent countless hours braiding and caring for my hair, I know that many questions come up when creating and maintaining the perfect 2 braids style. Here, I’ll answer some of the most common questions I’ve encountered:
1. What’s the Difference Between Dutch and French Braids?
Dutch braids are created by crossing sections under each other, while French braids are created by crossing sections over each other. Dutch braids sit on top of the hair, while French braids are woven into the hair.
2. How Often Should I Wash My Braids?
It’s best to wash your braids every 2-3 weeks, depending on your scalp’s oiliness and activity level. Use a gentle, sulfate-free shampoo and focus on cleansing your scalp rather than your braids.
3. How Can I Prevent My Braids from Frizzing?
To prevent frizz, moisturize your braids with a lightweight oil or spray and protect them while sleeping with a silk or satin scarf or bonnet. Avoid pulling or tugging on your braids, and remember to seal your ends.
4. Can I Use Regular Hair Products on My Braids?
Using lightweight, non-greasy products specifically designed for braids or protective styles is best. Heavy products can cause buildup and weigh down your braids, leading to damage and breakage.
By understanding the differences between braiding techniques and following proper maintenance strategies, you can create and care for your 2 braids style confidently and easily.
Final Thoughts
You now have all the knowledge and skills necessary to create and maintain a stunning 2 braids style that perfectly suits your personality and lifestyle.
From mastering basic braiding techniques to exploring advanced methods and creative styling options, you’ve discovered the endless possibilities that the 2 braids style has to offer.
As you continue braiding, remember to experiment, have fun, and make the style your own.
Whether you prefer sleek and sophisticated goddess braids or playful and quirky stitch braids, the key is to embrace your individuality and let your creativity shine through.
Don’t be afraid to mix and match techniques, colors, and accessories to create a look that’s uniquely you.
With practice, patience, and a willingness to try new things, you’ll soon become a braiding pro, creating jaw-dropping 2 braid styles that turn heads and inspire others.


