Don’t you think the press-on or artificial nails are quite trendy these days? Have you ever tried them yourself? If not, you must give them a try. They are super easy to use, and you get flawless, polished nails within a few minutes.
Also, they are an ideal option if you do not want to risk your natural nails for nail art. Artificial nails are also accessible, and you do not need to leave the comfort of your home to get manicured and polished whenever you want to put them on.
But if you are new to it and do not know how to apply pre-made artificial nails, you have come to the right place. In this blog, we will discuss a detailed guide on how you can apply press-on nails like a pro. We will also cover other essential details you need to know, like what it is, its benefits, and more.
So, what are you waiting for? Let’s begin with the process!
What are Press-On Nails?

For most fashion and nail artists, the definition of a press-on mani (artificial nails) depends on your chosen brand and product. Most of the artificial or press-on mani are made with acrylic resin solution that you can put on your original nails in a few seconds. They closely resemble the high-quality salon mani (as long as you use the best-in-class product).
Besides their flawless appearance, they come in various designs, styles, shapes, and colors. Also, you can use them in various budgets. For example, some artificial nails may come very cheap, while others may cost you dollars depending on the quality.
How Does It Work?

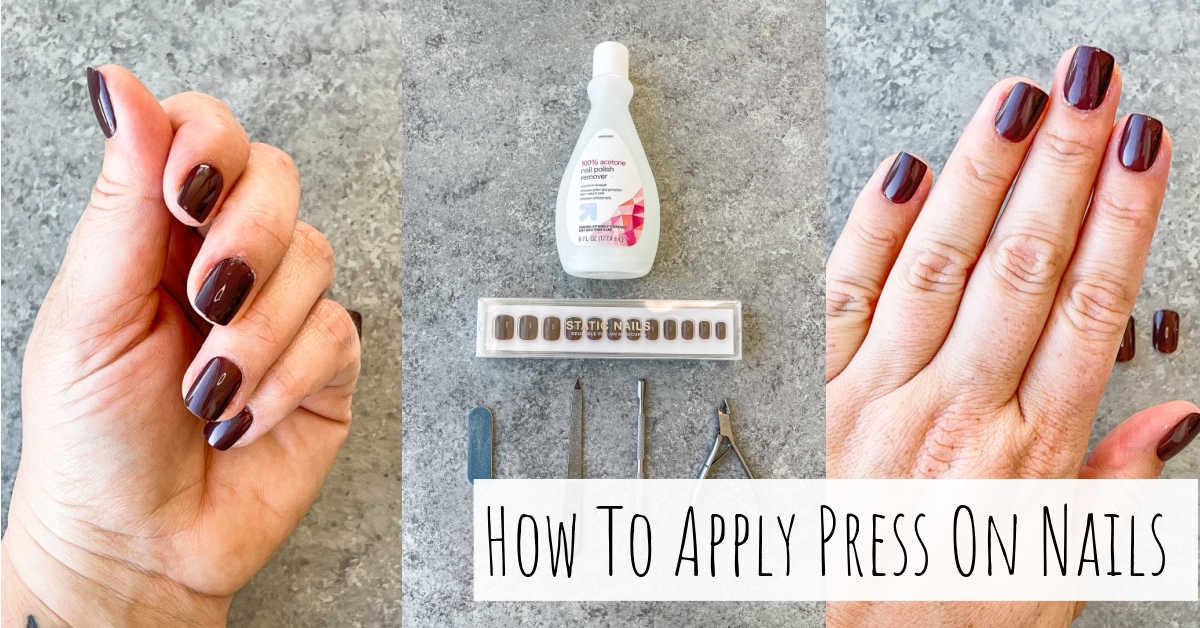
If you are trying press-on nails for the first time, then it will be wise to know how they work. It will make the process of applying press-on mani more easy and more transparent. Most artificial nails come in a kit where you get a file, cuticle-pusher, and glue along with the nails.
The five nails come in individual boxes. Each box can contain multiple shapes and sizes of nails to make it easier to pick your preferred press-on mani size. But if the nail still feels a little odd, you have the file to reshape and resize it according to your needs. Once you have selected your press-on mani, glue them and apply it to your nails.
But if you want more detailed steps to put on artificial nails, we will get you a step-by-step guide for your help.
Steps to Put on Press-On Nails
Still, wondering how you can put your press-on nails like a pro? There’s no need to worry about it anymore. Here is your step-by-step guide to putting stick-on nails with perfection so they look like professional manicuring at salons:
Step 1: Begin with Room Temperature Hands

Anyone may not have told you this before, but it is important to ensure your hands are at room temperature before applying fake nails. It is because if you apply press-on nails on hands that are too warm or cold, they may begin to peel off soon. So, ensure your hands, especially nails, are at room temperature before you begin the process.
Step 2: Clean Your Original Nails

Your next step will be cleaning your natural nails before you put the stick-on nails. Use nail polish remover to wipe off all the old nail paint. Also, remove all the dust, dirt, oil, grease, and moisturizer from your nails before putting on the press-on. If you do not clean your nails properly, your stick-on nails will not last long.
Step 3: Side Those Cuticles of Your Nail

This is also an important step in applying press-on nails without any bumps or stains. Once you have removed your old nail paints and cleaned your nails thoroughly, you can side your nail cuticles.
It will be wise to give your natural nails a proper manicure before applying pre-made nails. But if you are in a hurry and cannot make time to give your nails a proper manicure, you must corner your cuticles.
Use a cuticle remover to side your nail cuticles. But remember not to shine up your nails. You can remove ridges for a proper stick-on nail application. Also, leave your nail surface uneven for a good grip.
Step 4: Select Your Suitable Size

Next, select a suitable size for your press-on nails. Most stick-on nail kits come with multiple size options for each nail. So, you have multiple size options to try. Find a nail size that fits your actual nails best.
To measure the size, place a template over your nail. Keep the curved edges up and place them under the cuticles to get the right measure. Also, remember to check that the sides of your fake nails do not overlap with your skin while choosing the size. You can trim them later, but it will be best to pick the most suitable size with measure.
Step 5: Glue And Stick / Peel And Stick Fake Nails

Your next step to apply pre-made nails will vary depending on the type of press-on nails you have. Press-on is available in both glue and stick and peel-and-stick versions. If you have the peel-and-stick kit, hold your press-on nail with straight edges from above without touching the curves. Now, slowly remove the protection backing and put them one by one on your nails.
And if your stick-on nails do have a protective backing, glue them up before placing them on your nails. Place your stick-on nails right from the nail bed below the cuticles. Also, try to place the edges of your press-ons as close to your nail sides as possible.
Hold the nail for a few seconds to ensure a tight bond. Try to place it properly at the first chance. Because removing and re-applying can affect its fitting and how long it will last on your nails.
Step 6: Cut Off Excessive Parts With A File

Lastly, you need to remove the excessive part of the press-on nails. Smoothing out excess portions is essential to make them firm over your natural nails and look full. But remember, it is also one of the trickiest parts of applying stick-on nails.
To ensure a smooth finish, do not rush and slowly file the excess part of the fake nail with downward strokes of a nail file. Once you have removed the excess portion of the press-ons, use a nail clipper to remove any uneven or white edges left from filing the nails. In the end, you will get flawless press-on nails that will look like high-quality salon-like nails.
How to Remove Press-On Nails?

Knowing how to apply press-on nails is not enough; you must also know how to remove them properly. It will ensure you do not hurt your press-ons or your natural nails.
Here are the quick ways to remove stick-on nails:
1. Soak in Soap Water
Soaking your press-on nails in soap water is the most basic yet effective way to remove them. Soak your nails in the warm, soap-water solution for 10-15 minutes. It will help loosen the nail glue or adhesive between the press-ons and your original nails.
2. Slowly Lift from Edges
After soaking your nails in the soap water solution, try to lift the edges of your false nail with gentle pulling. Begin from the bottom of the press-ons and slowly move to the top. But remember, if they do not come off easily, do not force them. If you try to apply your for, you may end up hurting your natural nails.
3. Use an Orange Wood Stick or Cuticle Pusher
If soaking in soap water and gentle pulling does not work, it’s time to get some tools for help. Bring your orange stick or Cuticle Pusher to remove the press-on nails slowly. Start from the base and slowly move to the edges to avoid hurting them.
4. Apply Oil
If your press-ons are a bit rigid and all the ways mentioned above fail to remove them, try applying oil to them. You can use Cuticle oil or olive oil to remove the press-on. Apply the oil all over the edges and leave for a few minutes. It will help to loosen up the glue.
5. Soak in Acetone-Based Nail Paint Remover
Somehow, if the oil application also fails to remove them, do not panic. We have the master solution, acetone. Acetone-based nail paint remover can help you easily remove your press-on or stick-on nails. But remember, they can make your nails and skin dry and damage the press-on. So, you should only use them when it is necessary.
Benefits of Using Press-On Nails

The press-on nails have more to offer than the appearance. So, if you are planning to try press-on mani, you may like to learn about their advantages too.
Here, we will list the essential benefits of using press-on or stick-on nails:
1. Easy to Use: The press-on nails are very easy to use, and you can put them on your own without professional help. With these artificial nails, you can get salon-like high-quality mani at home. Pick your suitable sizes, glue, and press on your original nail. And you are all set.
2. Saves Time: If you are someone who loves to create statements with beautiful nail art but does not have much time to devote, then press-ons are ideal for you. The press-on mani has various beautiful designs, shapes, colors, and sizes to fit different needs.
3. Customizable: The best part of using artificial mani is they are customizable according to the users’ need/choice. You can find them in various sizes and shapes. Also, you use a file to resize/reshape according to your needs.
4. In trend: The press-on mani is trendy and looks stunning with beautiful colors and designs. A lot of people nowadays prefer them. So, wearing artificial nails is also a great way to catch up with fashion trends.
5. Harmless: The press-on mani is also harmless and does not affect the health of your nails. They are better than acrylic or gets (which weakens your nail). If you want to make your nails flawless without harmful items, you must opt for a press-on.
6. Endless options: Another essential benefit of using artificial nails is endless options to explore, whether about shapes, sizes, or designs. You can pick your favorite design and colors in the right shape of nails without any hazardous process. From lavish colors to funky designs, you can get a mind-blowing variety to explore.
How to Make Them Stay Longer?

The key method to make your press-on nails stay longer is to maintain them well. Proper care will enhance their lifetime, and you can use them for a long time.
- Avoid water – If you want your press-ons to last longer, avoid using them in water. Frequent contact with water can loosen the glue, and your false nail will come off quickly.
- Wear gloves – You should always wear gloves while doing regular house chores. It will protect your fake nails from getting hurt.
- Use file instead of a clip – The safest way to remove the excess portion of press-on mani is to use a file to smooth it out. Using a clip may be a quick solution, but it harms your press-on.
- Top coat application – Apply a clear top coat every 2-3 days, which will keep your stick-on nails firm. You can try NAIL-AID No-light Gel Top Coat for best results.
Summing It Up
Press-on nails are the easiest and most popular way to dazzle your nails. They are easy to use, cost-effective, and, of course, super stylish. You can get beautiful nails at home without visiting the salon or calling professionals.
The press-ons are very effective and convenient, whether about variety or price. Most stick-on nails come with multiple size options and an easy application process.
We have discussed the steps to put stick-on nails. We have also covered other essential details like what it is, how it works, and ways to remove any tips to make them last longer.
Bring home your favorite stick-on nail kit today and try it. Also, you can save this blog if you find the details helpful.
Frequently Asked Questions
Are Press-On Nails Safe?
Press-on nails are completely safe. But you must keep some aspects in mind so that you do not damage your natural nails. Always use high-quality press-ons, Glamnetic Press On Nails; apply and remove them properly to be on the safe side.
What is the Best Way to Remove Press-On Nails?
You should be very careful while removing your press-on nails. The best way to remove press-ons is by soaking them in soap water. You can also use acetone if plain or soap water does not work.
Can You Reuse Press-On Nails?
You can reuse your press-on nails. To do so, you must use proper methods to apply, remove and store them. Also, you must use high-quality press-ons to re-use them 5 times at most.


