Struggling to achieve the perfect burst fade haircut at home? Are you tired of uneven lines and patchy fades ruining your look?
Fear not! We’ve got you covered with our step-by-step guide to nailing that sleek, stylish burst fade without breaking the bank at the barbershop.
In this article, you’ll discover the secrets to mastering the art of the burst fade, from selecting the right tools to blending like a pro.
Say goodbye to hair mishaps and hello to a fresh, clean cut that will turn heads wherever you go.
Get ready to unleash your inner barber and take control of your style with our foolproof DIY burst fade tutorial!
What are Burst Fade haircuts?
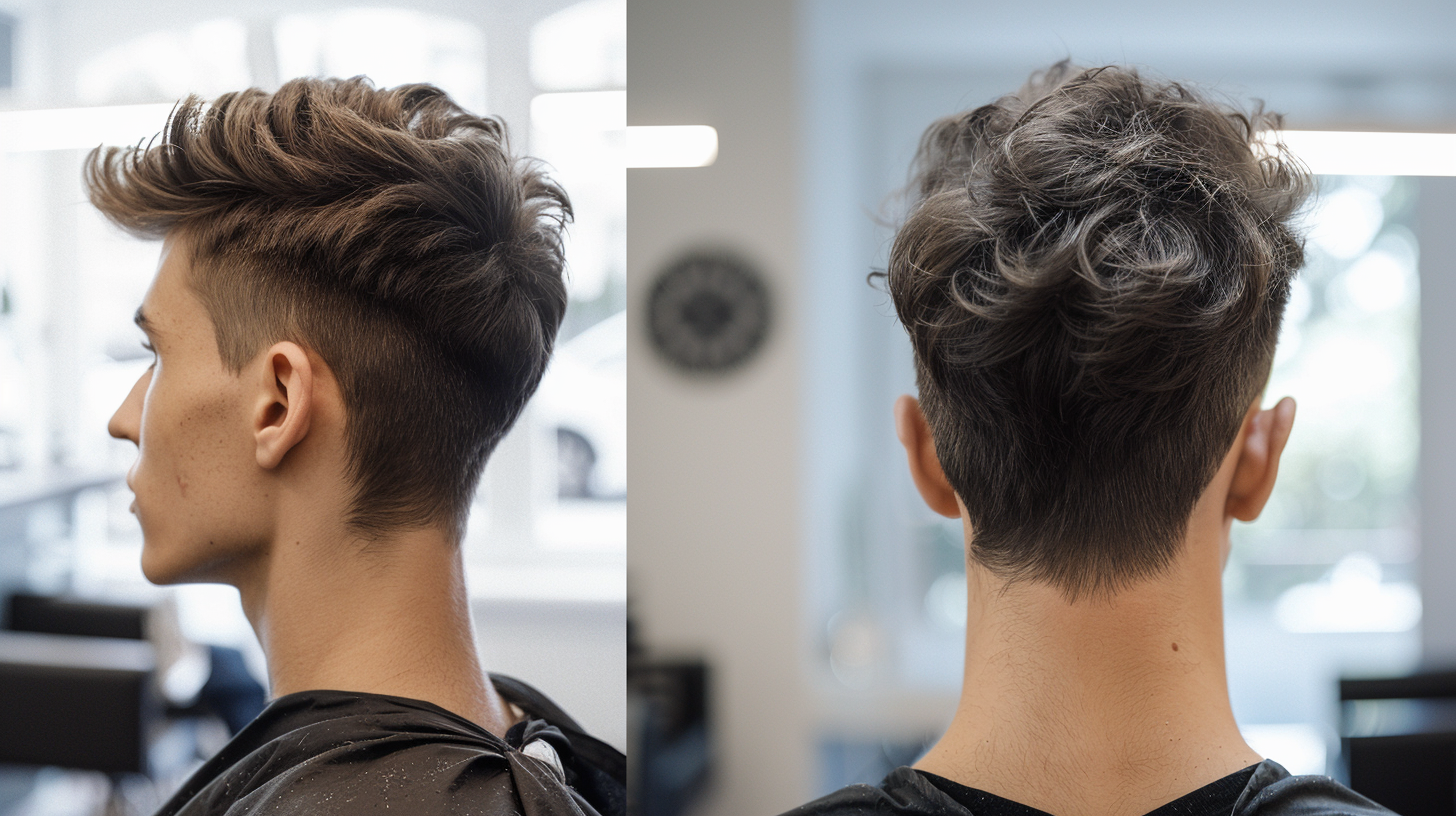
A burst fade haircut is a unique style where the hair is cut short and gradually fades in a circular pattern around the ears, seamlessly blending with the hair at the back of the head.
This eye-catching style has gained significant popularity recently due to its clean, modern look.
Originating from the influence of hip-hop culture and urban fashion trends, the burst fade has evolved into a versatile haircut that suits various hair types and personal styles.
Its popularity has skyrocketed, with the burst fade frequently gracing the pages of fashion magazines and trending on social media platforms.
Celebrities and trendsetters have embraced this stylish cut, further cementing its place in contemporary grooming.
Tools and Products Needed for Burst Fade Haircut
Having the right tools and products on hand is crucial before starting your DIY burst fade haircut. The essential items include a high-quality pair of clippers, various guard sizes, scissors, a comb, and styling products.
1. Clippers
When selecting clippers, opt for a reputable brand with features such as adjustable blade lengths and a powerful motor.
Cordless clippers provide flexibility and maneuverability, while corded models ensure a consistent power supply. Look for clippers with sharp, precision blades to achieve clean, even cuts.
A set of guards ranging from #1 to #8 will give you the versatility to achieve different lengths and gradients. Each guard size represents a specific hair length, with #1 being the shortest and #8 being the longest.
2. Scissors
Scissors are essential for detail work and trimming stray hairs. Invest in a pair of sharp, professional-grade barber scissors for the best results.
Regular scissors may suffice for minor touchups, but they lack the precision and sharpness of dedicated barber scissors.
3. Combs
Combs are another must-have tool for your burst fade haircut.
A wide-tooth comb is ideal for detangling and smoothing the hair before cutting, while a fine-tooth comb helps create precise lines and sections during fading.
Understand Your Hair Type
Before starting your burst fade haircut, it’s essential to understand your hair type and the length you wish to achieve.
Hair types can be broadly categorized as straight, wavy, curly, or coily, and each type may require slight adjustments in cutting techniques and product use.
1. Curly Hair
When cutting a burst fade on curly hair, use a comb to gently stretch the hair as you clip, helping to create a smoother, more even fade.
You may also want to use a leave-in conditioner or anti-frizz serum to help tame any flyaways and define the natural curl pattern.
2. Straight Hair
To add volume and texture to straight hair, use a blow dryer and a round brush to lift the hair at the roots and create the body.
You can also use a texturizing product like clay or sea salt spray to add grip and definition to your fade.
For a more pronounced fade on straight hair, consider using a slightly higher guard setting to create a more noticeable contrast between the faded sides and the longer top.
You can also experiment with different partings or brush the hair in various directions to create the illusion of more volume and depth.
3. Wavy Hair
When cutting a burst fade on wavy hair, pay attention to the direction and placement of the waves and adjust your clipping technique accordingly.
In some areas, a higher guard setting may be needed to accommodate the wave pattern and ensure an even fade.
Techniques to Ensure Even Fades and Cuts
Achieving symmetry and balance in your burst fade haircut is key to a professional-looking result.
Before starting, use sectioning clips to divide the hair into manageable parts, such as the top, sides, and back. This will help you plan your cuts and ensure an even length distribution.
When cutting, start from a central point, such as the middle of the back or the top of the head, and work your way outwards in equal increments on both sides.
This will help maintain symmetry and prevent uneven cuts.
As you progress through the haircut, regularly check for evenness using mirrors or stepping back to assess the overall balance.
Compare the length and shape of the fade on both sides of the head, and make adjustments as needed.
If you notice discrepancies, use blending techniques to smooth the transition between different lengths.
This can involve combing and scissors to carefully trim stray hairs or a smaller clipper to blend the fade.
To achieve a seamless fade, start with the shortest guard size at the bottom of the fade and gradually increase the length as you move up.
Use the taper lever on your clippers to fine-tune the blend between each length, creating a smooth transition from one guard size to the next.
Work slowly and carefully, taking your time to ensure a clean, polished result.
Pay special attention to the area around the ears and the back of the neck for a perfect burst fade.
Use a combination of clippers and scissors to create a clean, rounded shape that follows the natural contours of the head.
Blend the fade into the longer hair on top, using a comb to help guide your clippers and create a smooth transition.
By mastering these fundamental cutting techniques and tips for symmetry and balance, you’ll be well on your way to achieving a professional-looking burst fade haircut at home.
Remember to take your time, work methodically, and don’t be afraid to make adjustments as needed to ensure the best possible result.
Step-by-Step Guide to Cutting a Burst Fade
Initial Hair Preparation
Before diving into the cutting process, starting with clean, well-prepared hair is crucial.
This step ensures that your hair is free from any dirt, residue, or excess oils that may hinder your ability to achieve a precise and even cut.
To begin, thoroughly wash your hair using a suitable shampoo for your hair type.
Gently massage the scalp to remove any buildup and rinse the hair with lukewarm water until the water runs clear.
Depending on your hair type and the desired style, you may cut your hair while it’s slightly damp or completely dry.
Cutting the hair when it’s dry can provide better visibility and control for those with straight or slightly wavy hair.
However, cutting your curly or coily hair while it’s slightly damp can help you see the natural pattern and texture more clearly.
Once you’ve washed your hair, air-dry it or use a blow dryer on a low heat setting to achieve the desired dryness level.
Cutting Steps for Burst Fade Haircut
1. Establishing the Baseline Fade
The baseline fade serves as the foundation for your burst fade haircut. It involves creating an even and symmetrical guideline around the head, which will be the starting point for the burst effect.
Select the appropriate guard size for your clippers to create the baseline fade.
A good starting point is usually a #2 or #3 guard, depending on the desired length.
Begin at the back of the head, just above the neckline, and work up to the temples, moving the clippers in smooth, upward motions.
Ensure you maintain consistent pressure and angle to achieve an even fade around the head.
2. Creating the Burst Effect
The burst effect is what sets this haircut apart from a regular fade.
It involves tapering the hair around the ears in a circular or semi-circular pattern, creating a “bursting” appearance.
Remove the guard from your clippers and carefully tap the hair around the ears to achieve this effect.
Angle the clippers slightly outward, following the natural contours of the head.
Gradually blend the tapered area into the baseline fade using a flicking motion with the clippers.
This technique helps create a smooth transition between the burst and the rest of the hair.
As you work your way up, use a higher guard size to blend the fade into the longer hair on top.
A common technique is to use a #1 guard for the area just above the burst, then switch to a #2 guard for the next section, and so on until you reach the desired length on top.
3. Detailing and Refining the Cut
Once you’ve completed the main cutting steps, it’s time to focus on the details that will elevate your burst fade from good to great.
This involves using trimmers and styling shears to clean up edges, create sharp lines, and refine the overall look.
Start by using a pair of trimmers to clean up the hairline around the ears, back of the neck, and temples.
This step helps create crisp, defined edges that give the haircut a polished appearance.
Be careful not to trim too much, as this can alter the shape of the burst fade.
Next, use styling shears to blend any remaining harsh lines or uneven areas.
Hold the shears vertically and use a point-cutting technique to texturize and soften the transitions between different lengths.
This technique rapidly opens and closes the shears while moving them along the hair shaft, creating a more natural, blended look.
Common Mistakes and How to Avoid Them While DIY Burst Fade Haircut
1. Cutting Too High Too Soon
One common mistake beginners make is starting the fade too high on the head, which can result in a disconnected or unbalanced look.
To avoid this, start with a lower guard size around the ears and gradually work your way up, increasing the guard size as you go.
This approach ensures a smooth, gradual transition from the shortest to the longest length.
2. Uneven Fade
An uneven fade can ruin your burst fade’s symmetry and overall appearance.
To prevent this, regularly check your progress using mirrors to compare both sides of the head.
Ensure the fade is consistent in height and shape around the head.
If you notice any discrepancies, use your clippers or shears to blend and even out the areas as needed.
3. Over-Thinning the Top
While the focus of a burst fade is on the tapered sides, it’s important not to neglect the hair on top.
Avoid removing too much volume or length from the top, as this can throw off the balance of the haircut.
Instead, use scissors to gently trim and shape the top, maintaining enough length to complement the faded sides.
By following this step-by-step guide and avoiding these common mistakes, you’ll be well on your way to achieving a clean, professional-looking burst fade haircut at home.
Variations in Burst Fade Haircut
1. Mohawk Burst Fade

The mohawk burst fade combines the edginess of a traditional mohawk with the smooth, tapered sides of a burst fade.
To achieve this look, leave a strip of longer hair down the center of the head while fading the sides and back as usual. The contrast between the longer mohawk strip and the short, faded sides creates a bold, eye-catching style.
Styling tips
To maintain the mohawk burst fade, use a strong-hold pomade or gel to keep the central strip of hair standing upright.
You can also experiment with different lengths and textures for the mohawk portion, such as a shorter, spiky look or a longer, more flowing style.
2. Mullet Burst Fade

The mullet burst fade puts a modern twist on the classic “business-in-the-front, party-in-the-back” hairstyle.
This variation features the signature burst fade on the sides and back while keeping the hair longer, similar to a traditional mullet.
Styling tips
To balance the faded sides with the longer hair in the back, use a texturizing product like a salt spray or matte pomade to add definition and movement to the mullet portion.
You can also play with different lengths and shapes for the back, such as a more subtle, tapered mullet or a bolder, more pronounced style.
Conclusion
Mastering the art of the burst fade haircut at home is an achievable goal with the right tools, techniques, and patience.
By following our step-by-step guide and incorporating the advanced tips and techniques, you can create a stylish, personalized look that reflects your unique personality.
Remember, the key to success is practice, attention to detail, and a willingness to experiment with variations and customizations.
Whether you have curly, straight, or wavy hair, the burst fade offers a versatile and adaptable style tailored to your needs and preferences.
So why not leap and unleash your inner barber? With a little creativity and confidence, you’ll be rocking a perfect burst fade in no time!


